Category: Tutorials

  • Best Secure Data Transfer | Easy & Safe Methods

    Best Secure Data Transfer | Easy & Safe Methods

    Secure data transfer is crucial in today’s digital environment. Data can include financial information, business records, and personal information. Data can be stolen or misused if it is not transferred securely. For this reason, it is essential to use secure data transport techniques. Let’s examine a few of the most effective secure data transport techniques.

    Encryption

    Encryption is one of the best ways to keep data safe. It changes data into a code so only the right person can read it. Even if someone steals the data, they cannot understand it without a special key. There are two types of encryption: symmetric and asymmetric. Symmetric encryption uses one key to lock and unlock data, while asymmetric encryption uses two keys, one for locking and another for unlocking. Examples of encryption methods include AES (Advanced Encryption Standard) and RSA (Rivest-Shamir-Adleman).

    Secure File Transfer Protocol (SFTP)

    SFTP is a secure way to send files over the Internet. It uses encryption to protect data during transfer. SFTP is better than the old FTP (File Transfer Protocol) because FTP does not encrypt data, making it easy for hackers to steal information. Many businesses use SFTP to transfer files safely.

    Virtual Private Network (VPN)

    A VPN creates a secure tunnel between two devices. It hides your internet activity and keeps data safe from hackers. When using a VPN, all data sent and received is encrypted. This makes VPNs useful for businesses and individuals who want to protect their data while using the internet.

    Secure Socket Layer (SSL) and Transport Layer Security (TLS)

    SSL and TLS are security protocols that protect data when it is sent over the internet. They are used for websites, emails, and online transactions. When you visit a website with “https” in the address, it means SSL or TLS is being used. TLS is the newer and more secure version of SSL.

    End-to-End Encryption (E2EE)

    E2EE makes sure that only the sender and receiver can read a message. This method is used in messaging apps like WhatsApp and Signal. Even if someone intercepts the message, they cannot read it because it is encrypted.

    Cloud Security Measures

    Many people and businesses use cloud storage to save and share data. Cloud services offer security measures like encryption, password protection, and multi-factor authentication (MFA). These features keep data safe from hackers.

    Secure Email Services

    Emails can contain sensitive information. Using secure email services like ProtonMail or encrypted email services helps keep emails safe. Some email providers also offer PGP (Pretty Good Privacy) encryption to protect messages from being read by others.

    Blockchain Technology

    Blockchain is a secure way to transfer data because it records all transactions in a way that cannot be changed. It is used in cryptocurrency, contracts, and secure file transfers. Blockchain technology ensures that data remains safe and cannot be altered by unauthorized users.

    Multi-Factor Authentication (MFA)

    MFA adds an extra layer of security to data transfers. Instead of just using a password, MFA requires a second verification step, such as a fingerprint, SMS code, or authentication app. This prevents hackers from accessing data even if they have the password.

    Zero Trust Security Model

    The Zero Trust model means that no one is trusted by default, even inside an organization. Users must verify their identity every time they access data. This method prevents unauthorized access and ensures that only the right people can transfer or receive data.

    Secure Messaging Apps

    Regular text messages are not secure. Using messaging apps like Signal, Telegram, or WhatsApp, which have strong encryption, ensures that messages remain private and secure during transfer.

    Data Loss Prevention (DLP) Tools

    DLP tools help prevent data from being leaked or stolen. These tools monitor data transfers and block unauthorized sharing of sensitive information. Businesses use DLP to ensure that employees do not accidentally send important data to the wrong person.

    Secure Hardware and Devices

    Using secure USB drives and encrypted external hard drives helps protect data during physical transfers. Some secure USB drives require a password or fingerprint to access the stored data.

    Secure File Sharing Platforms

    Services like Google Drive, Dropbox, and One Drive offer security features such as encryption, access control, and activity monitoring. This ensures that only authorized users can access and transfer files securely.

    Regular Security Updates and Patches

    Cyber threats are always changing. Regularly updating software, apps, and security systems helps prevent hackers from exploiting security flaws. Businesses and individuals should always keep their systems up to date.

    Conclusion

    Secure data transfer is essential to protect personal and business information. By using encryption, VPNs, SSL/TLS, and secure file transfer methods, data can be kept safe from hackers and cyber threats. Businesses and individuals should always follow best practices to ensure secure data transfer and protect their sensitive information from being misused.


  • 301 and 302 Redirects| Keep your Audience on the Right Track

    301 and 302 Redirects| Keep your Audience on the Right Track

    Ensuring your visitors find the correct pages is essential when managing a website. Sometimes, pages get moved, URLs change, or you simply need to guide your audience to a new location. This is where redirects come into play. Redirects are tools that automatically send users from one URL to another. Two of the most common types are 301 and 302 Redirects. Let’s dive into how they work, their differences, and how to use them effectively.

    What Are 301 and 302 Redirects?

    A redirect is a way of telling browsers and search engines that a page’s location has changed. Think of it as a road sign pointing visitors to a new destination.

    301 Redirect (Permanent):
    This type of redirect tells search engines and browsers that the page has permanently moved to a new location. It passes most of the original page’s ranking power (SEO juice) to the new page. For example:
    If you move your blog from example.com/blog to example.com/articles, a 301 redirect ensures your readers and search engines find the new page.

    302 Redirect (Temporary):
    This redirect tells browsers and search engines that the change is temporary. It does not transfer SEO benefits because the original page is expected to return. For example:
    If you’re updating a webpage but want to direct visitors to a temporary location, a 302 redirect is the right choice.

    Why Are Redirects Important?

    Redirects are crucial for maintaining a smooth user experience and keeping your website’s SEO intact.

    Avoid Broken Links:
    When pages move or URLs change, visitors clicking old links might see a “404 Error: Page Not Found.” Redirects prevent this by taking them to the right place.

    Retain SEO Rankings:
    If a high-ranking page changes its URL, a 301 redirect ensures that its ranking transfers to the new URL. This helps maintain your site’s visibility in search engines.

    Improve User Experience:
    Redirects ensure your visitors don’t hit dead ends and instead land on relevant content quickly.

    Facilitate Website Redesigns:
    When redesigning your site or changing its structure, redirects help transition old URLs to new ones seamlessly.

    When to Use 301 and 302 Redirects

    Understanding when to use each type is essential for effective website management.

    Use 301 Redirects When:

    The page is permanently moved or deleted.

    Merging two pages or consolidating content.

    Changing domain names or site URLs.

    Example: Moving from example.com/old-page to example.com/new-page permanently.

    Use 302 Redirects When:

    You’re conducting a temporary campaign or promotion.

    Testing a new webpage but planning to revert later.

    Redirecting visitors to a seasonal page.

    Example: Redirecting example.com/summer-sale to example.com once the sale is over.

    How to Set Up 301 and 302 Redirects

    Here’s a step-by-step guide to implementing redirects:

    Use an .htaccess File (For Apache Servers)

    For websites running on Apache servers, you can set up redirects in the .htaccess file.
    301 Redirect Example:
    apache
    Redirect 301 /old-page.html https://www.example.com/new-page.html
    302 Redirect Example:
    apache
    Redirect 302 /temporary-page.html https://www.example.com/temp.html
    Use Server Configuration (For Nginx Servers)
    On Nginx servers, add the following lines to the server configuration file:
    301 Redirect Example:
    nginx
    rewrite ^/old-page$ https://www.example.com/new-page permanent;
    302 Redirect Example:
    nginx
    rewrite ^/temporary-page$ https://www.example.com/temp redirect;
     

    Use a Content Management System (CMS)

    If your site runs on platforms like WordPress, Joomla, or Drupal, there are plugins or built-in tools to manage redirects easily.
    For WordPress: Use plugins like Redirection or Yoast SEO.
    For Joomla: Use the Redirect Manager extension.
    For Drupal: Use the Path Redirect module.
     

    Set Up Redirects with Your Hosting Provider

    Many hosting providers offer tools in their control panels (e.g., cPanel or Plesk) to create redirects without touching code.

    Best Practices for Redirects

    Use the Right Type: Always choose 301 for permanent changes and 302 for temporary ones.

    Avoid Redirect Loops: Ensure that one redirect doesn’t point back to itself or create a chain of redirects.

    Update Internal Links: Once you’ve set up a permanent redirect, update internal links to point directly to the new URL.

    Monitor Redirects: Regularly test your redirects to ensure they’re working as intended. Use tools like Google Search Console or Screaming Frog for this.

    Conclusion

    301 and 302 redirects are powerful tools to ensure your website remains user-friendly and search-engine optimized. By understanding their differences and using them strategically, you can improve user experience, maintain SEO rankings, and handle website changes effortlessly. Always plan your redirects carefully and monitor them for the best results.

  • How to Integrate Your Business Email with Google Workspace

    How to Integrate Your Business Email with Google Workspace

    In today’s digital age, having a professional and efficient email system is crucial for businesses of all sizes. Google Workspace (formerly G Suite) offers a comprehensive suite of productivity tools, including Gmail, which is renowned for its reliability and ease of use. Integrating your business email with Google Workspace can streamline your communication, enhance collaboration, and boost productivity. This guide will walk you through the steps to seamlessly integrate your business email with Google Workspace.

    Why Integrate Your Business Email with Google Workspace?

    Before diving into the integration process, let’s explore some of the benefits of using Google Workspace for your business email:

    1. Professionalism: Using a business domain for your email (e.g., [email protected]) adds a level of professionalism and credibility to your communications.
    2. Storage and Collaboration: Google Workspace offers ample storage for emails and documents, and its collaborative tools (Google Drive, Docs, Sheets, etc.) enhance teamwork.
    3. Security: Google Workspace provides robust security features, including two-factor authentication, data encryption, and advanced phishing protection.
    4. Accessibility: With Google Workspace, you can access your email and documents from any device, anywhere, ensuring you stay connected on the go.

    Step-by-Step Guide to Integrate Your Business Email with Google Workspace

    1. Sign Up for Google Workspace

    The first step in integrating your business email with Google Workspace is to sign up for the service. Follow these steps:

    1. Visit the Google Workspace website.
    2. Click on the “Get Started” button.
    3. Follow the prompts to enter your business information, such as your business name, number of employees, and country.
    4. Provide your current email address and choose a domain for your business email. If you already have a domain, you can use it; otherwise, you can purchase one through Google.

    2. Verify Your Domain

    To use your custom domain with Google Workspace, you need to verify ownership of the domain. Here’s how:

    1. Log in to your domain registrar’s website (e.g., Bytenap,10gbhosting) and access the DNS settings.
    2. Google will provide you with a TXT record to add to your domain’s DNS settings. This record confirms your ownership of the domain.
    3. Add the TXT record to your DNS settings and save the changes.
    4. Return to the Google Workspace setup page and click “Verify” to complete the verification process.

    3. Create User Accounts

    Once your domain is verified, you can start creating user accounts for your employees:

    1. In the Google Workspace Admin console, click on “Users.”
    2. Click the “Add New User” button.
    3. Enter the user’s first name, last name, and desired email address (e.g., [email protected]).
    4. Set a temporary password for the user and provide them with login instructions.

    4. Set Up Email Routing

    To ensure that your business emails are routed correctly through Google Workspace, you need to update your domain’s MX (Mail Exchange) records:

    1. Go to your domain registrar’s website and access the DNS settings.
    2. Locate the MX records section and delete any existing MX records.
    3. Add the new MX records provided by Google Workspace. These records ensure that emails sent to your domain are delivered to Google’s servers.
    4. Save the changes and allow some time for the DNS propagation (this can take up to 48 hours).

    5. Configure Email Clients and Devices

    Your employees can access their new Google Workspace emails via the Gmail web interface or by configuring their preferred email clients (e.g., Microsoft Outlook, Apple Mail). To configure an email client:

    1. Open the email client and navigate to the account setup section.
    2. Enter the user’s email address and password.
    3. Use the following server settings:
    • Incoming Mail Server: imap.gmail.com (IMAP) or pop.gmail.com (POP)
    • Outgoing Mail Server: smtp.gmail.com
    • Port Numbers: IMAP: 993, POP: 995, SMTP: 465 or 587

         4. Save the settings and test the email account to ensure it’s working correctly.

    6. Train Your Team

    To make the most of Google Workspace, it’s essential to train your team on its features and functionalities. Offer training sessions on:

    1. Using Gmail for business communications.
    2. Collaborating on documents with Google Drive, Docs, Sheets, and Slides.
    3. Scheduling and managing meetings with Google Calendar.
    4. Leveraging Google Meet for video conferencing.

    7. Optimize Security Settings

    Ensure your business email remains secure by configuring advanced security settings in the Google Workspace Admin console:

    1. Implement two-factor authentication (2FA) across all user accounts.
    2. Set up data loss prevention (DLP) rules to protect sensitive information.
    3. Monitor and audit account activity to detect suspicious behaviour.


    Conclusion

    Integrating your business email with Google Workspace is a smart move that can enhance your organization’s communication and collaboration capabilities. Following these steps, you can ensure a smooth transition to Google Workspace and take full advantage of its powerful features. ByteNap, as a trusted business email and Google Workspace hosting service provider, is here to support you throughout the integration process, ensuring that your business email system is efficient, secure, and professional. Remember, a well-integrated and secure email system is a cornerstone of any successful business in the digital age.

  • The Detailed Guide to Web Hosting

    The Detailed Guide to Web Hosting

    Choosing the right hosting for your website project can be challenging. Our Ultimate Guide to Web Hosting can assist you in understanding different hosting options to make an informed decision.

    If you are new to web hosting, managed hosting is a great way to begin. Managed hosting simplifies the process of launching your website, eliminating the need to navigate through technical complexities associated with services like VPS and Dedicated Servers. With managed hosting, the hosting company handles technical configurations and server issues. These services are scalable, providing growing websites with the necessary infrastructure to build, launch, and expand their projects easily.

    Explore our comprehensive guide to web hosting to discover various hosting types and select the best service to meet your website’s requirements.

    What is Web Hosting?

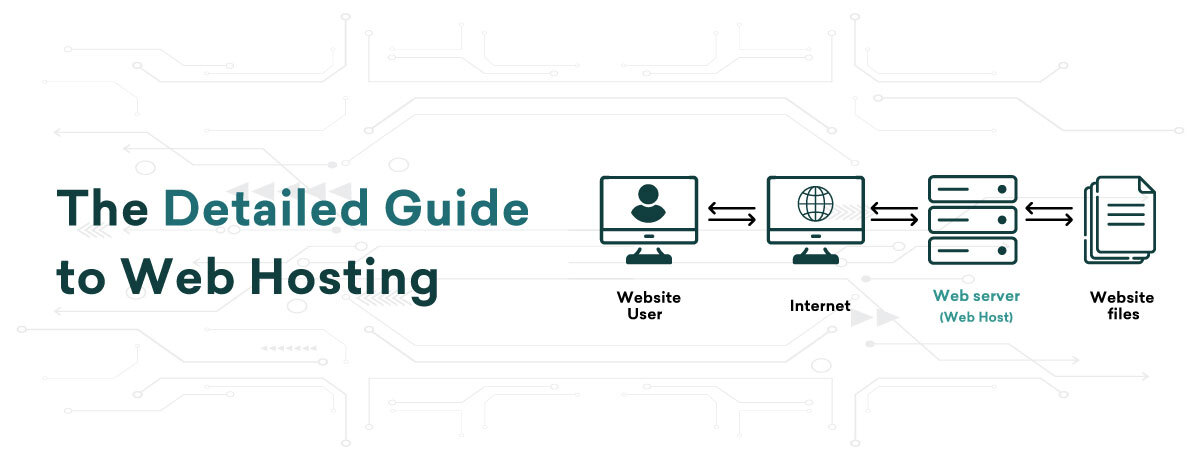
    Web hosting is a service on the internet that enables you to store, manage, and retrieve files, websites, and applications. This service relies on data storage servers and other infrastructure that are connected to the internet, operating 24/7 to ensure constant accessibility to the stored files online.

    In essence, when you create a website, all its files are housed on data servers. When a visitor accesses your site, data is transmitted from these hosting servers to their browser. The combined functions of storage, processing, and data transfer over the internet constitute web hosting services.

    Entities providing data storage and processing servers for web hosting are known as web hosts. By availing of a web hosting service, you render your website reachable to online users through the data servers provided by hosting companies. With this setup, anyone on the internet can visit your site by entering your domain in a browser.

    Since most businesses lack their own servers, they lease server space from web hosting entities. Servers serve as the technical backbone for housing websites and applications. Reputable web hosting providers deliver on the promise of 24/7 online availability and provide crucial technical assistance. This support becomes vital for website owners lacking the necessary technical know-how to handle various aspects of website hosting.

    How Does Web Hosting Work?

    The primary function of web hosting is to ensure your website is accessible on the internet. It involves data servers that are continuously operational and connected to the internet 24×7, enabling online visitors to access your websites. When a user enters a domain in a web browser like Google Chrome, the website hosted on these servers is retrieved and displayed to them online.

    Web hosting providers offer the necessary technologies for your sites to function effectively on the internet. They also provide server management support services to website owners lacking technical expertise in server management. With technical assistance from web hosting companies, website and business owners can concentrate on expanding their business rather than dealing with server maintenance.

    What are Different Types of Web Hosting?

    Various web hosting services are accessible in the market to cater to your requirements. The primary varieties of website hosting services include:

    1. Shared Hosting

    Shared hosting is ideal for small and new websites with low traffic. In this service, all web files from various users are stored on one server. This means server resources such as CPU, RAM, and disk space are shared among multiple websites on the same server.

    Server resources are shared among various web hosting account users, providing cost-effective access. Due to not leasing the entire server, expenses are divided among users, making shared hosting ideal and budget-friendly for new website owners.

    2. Virtual Private Server (VPS) Hosting

    This hosting service features a virtual server within a main physical server, splitting a large data storage and processing unit into smaller virtual servers. The division is not physical but virtual, concerning server resources like CPU, RAM, and Disk Space. Each virtual server has independent CPU, RAM, and disk space allocation, offering dedicated server performance at a budget-friendly price.

    VPS hosting is beneficial for expanding websites as all projects are hosted in a separate space on the server, though it is shared with other users. This service fulfills your needs for personalized web hosting. While handling traffic spikes and optimizing performance, it can be influenced by other sites on the server. In essence, VPS offers superior performance to shared hosting yet falls below dedicated servers. Furthermore, VPS demands slightly less technical know-how compared to Dedicated hosting.

    If you have a resource-intensive web project and seek affordable dedicated hosting services without the necessary technical expertise, you can opt for managed VPS hosting. This way, you can benefit from hosting operations at costs similar to shared hosting, while having hosting infrastructure comparable to dedicated servers. Through reliable VPS hosting servers, you will attain full root control over your servers.

    3. Dedicated Hosting

    Dedicated hosting grants website owners complete control over servers. It provides exclusive rental for the website, allowing enterprises handling numerous websites and applications to have full root and admin access. This service enables centralized control, including security and operating system management. However, the cost factor may deter small business owners from opting for this level of server resources.

    When opting for dedicated hosting, you rent the entire server for exclusive use, making it pricier than other services. Large websites or organizations with high online traffic often choose dedicated hosting for full server control. If you need technical support, consider managed dedicated hosting for seamless web application hosting.

    4. Cloud Hosting

    In today’s modern world, cloud infrastructure is rapidly gaining popularity. Cloud hosting involves a cluster of interconnected servers within a single network. Therefore, deploying web applications within this connected hosting infrastructure provides maximum scalability and accessibility for your web files. 

    Hosting servers are susceptible to malfunctions and encounter technical issues when managing resource-intensive websites and applications with high traffic fluctuations. Cloud hosting services provide users with resources distributed across multiple servers, minimizing the risk of downtime caused by server malfunctions.

    If your website expands, cloud hosting resources are scalable, allowing your site or app to utilize resources as needed. Essentially, in cloud hosting, resources are virtually limitless for scalability, and you only pay for the resources utilized by your site or app during a specific timeframe.

    5. Reseller Hosting

    In the hosting industry, a reseller hosting provider acts as a wholesaler while the reseller functions as a retailer. Reseller web hosting involves a smaller hosting company (the retailer) leasing servers and resources from a larger hosting company (the wholesaler), then selling these services to clients for a profit.

    Reseller hosting is ideal for small web service companies that cater to local clients, offering a cost-effective solution as they avoid significant upfront investments in infrastructure. Providers of reseller hosting services offer fully white-labeled solutions, enabling resellers to brand their hosting business effectively.

    Moreover, reseller hosting providers facilitate billing for end clients and offer technical support to resellers, alleviating concerns about  technical issues and web hosting management for the clients of resellers.

    Which Web Hosting Service is Right for You?

    After learning about various web hosting services, you might be wondering – which is the best hosting for me? When selecting web hosting services, choose a plan that fulfills your hosting needs. Assess if each plan aligns with your web hosting requirements.

    Choosing the appropriate web hosting plan involves careful consideration of the following aspects:

    – Number of websites to be hosted

    – Required disk space and RAM

    – Bandwidth (data transfer) limit needed

    – Your budget

    For novices and small-scale websites with limited hosting budgets, shared hosting services are recommended. If expecting increased website traffic, opt for VPS hosting services. For total server control, website owners should choose dedicated hosting services. Reseller hosting services cater to users starting their web hosting business.


    Conclusion

    In conclusion, choosing the right web hosting service is critical for your website’s success. Whether you’re a beginner or managing a high-traffic site, understanding options like managed, shared, VPS, dedicated, cloud, and reseller hosting helps match your needs for scalability, control, and budget. Explore our guide to make an informed choice and ensure your site has the solid hosting it needs to thrive online.

  • Benefits of Upgrading to Google Workspace

    Benefits of Upgrading to Google Workspace

    The likelihood is high that your team already uses Google for communication, be it Gmail or Google Duo for personal connections or Google Drive for sharing files and presentations at work. These consumer apps enable team communication and collaboration easily, for free. Hence, what’s the point in transitioning your small business to Google Workspace?

    The brief explanation is that Google Workspace provides your organization with increased control and additional features, enabling you to safeguard documents and data, collaborate more efficiently, and utilize advanced features and programs to enhance team productivity, collaboration, and information access.

    Google Workspace enables you to enjoy the advantages of genuine digital transformation, such as the capacity to operate in novel manners that facilitate hybrid and remote work setups. 

    Use the Gmail client to send branded emails

    With Google Workspace, you get all the attributes, reliability, and familiarity of Gmail, customized with your organization’s domain name. This offers employees the familiar user experience they are already comfortable with from using personal Gmail accounts, enabling them to seamlessly switch between personal and work accounts.

    Employers benefit from a premium enterprise-grade email service that offers control and security without the hassle of managing an email server. They can effortlessly add or remove users as the business grows.

    Furthermore, every user is allowed to have a maximum of 30 alias accounts. This enables a single individual to receive emails across multiple addresses such as [email protected], [email protected], and [email protected].

    Use Google Drive to save and share countless files

    Each user has a Drive account for storing personal notes, drafts, and files inaccessible to teammates. Furthermore, each team can possess a Team Drive, enabling file and resource sharing among members. Although sharing is possible via the consumer Drive version, users must individually grant access and set permissions. This process is time-consuming, and omission of necessary individuals requires them to request access, leading to delays as they await email approval from the document owner.

    With Team Drive, everyone who needs access already has it, and if an employee leaves the company, the Team Drive manager can quickly revoke their access to any company data. If everyone hosts and shares files from their personal Google accounts, then everyone has to remember to revoke access from former colleagues.

    Both individual and Team Drives offer unlimited cloud storage in Google Workspace for Enterprise. The Business Starter Google Workspace provides 30GB of storage, which is twice that of the free version. Additionally, there are options available for 2TB and 5TB storage capacities.

    Collaborate in real-time

    Collaboration can be difficult, even with everyone in the office, but it becomes even more complex as workers are now spread between the office and remote locations. Google Workspace provides a range of collaboration apps available only in the Business edition or through upgrades from the consumer edition.

    With real-time co-editing in Google Workspace, teams can simultaneously edit the same Doc, Sheet or Slide, eliminating version control concerns when working remotely or in a hybrid environment. Changes are immediate, allowing for collaborative idea-building and quick consensus through comments and action items. If discussions are needed, team members can easily schedule meetings using Team Calendar, have unrestricted Google Meet video calls, or resolve details via Team Chat. Google Currents enables the creation of an internal social network to enhance communication within the organization, facilitating content sharing, discussions, and employee engagement as the leadership team defines the company’s new normal.

    Integrate Google Workspace with third-party apps

    By integrating Google Workspace with CRM and other productivity applications, your team can seamlessly collaborate across platforms, all from within the Google Workspace app. Employees access work apps with a single sign-on, and they avoid wasting time switching between different tools, preventing duplicated efforts and data. This integration provides a productivity boost for your company, ensuring data consistency and reducing the risk of human errors.

    For instance, through CRM integration, salespeople and customer service representatives can automatically log tasks, calls, meetings, and emails in Salesforce directly from Gmail. They can also access contact and account insights from Salesforce within Google Workspace and effortlessly import CRM data into Google Sheets.

    Manage it all from the Admin Console

    The Google Workspace Admin Console enables you to oversee your data, users, and applications all in one place. User-friendly dashboards allow you to add or remove users and groups, personalize the user interface, manage devices, establish roles, grant permissions, and configure security settings.

    For instance, you have the ability to block untrusted applications, enforce security keys, or mandate two-step verification.

    When users log into Google Workspace or associated apps using a new computer or mobile device, Google will dispatch a text message containing a verification code that must be inputted before company data can be accessed. Additionally, Google Workspace offers advanced email scanning for security threat detection, as well as security analytics and recommendations to safeguard your business.

    Improve security with Enterprise-Level Endpoint Management

    The Admin Console allows you to manage Google Workspace accounts; Endpoint Management allows you to control the devices that can access those accounts.

    Using Google Workspace Endpoint Management, you can efficiently distribute apps on mobile devices at scale. You can monitor usage, adjust security settings, and restrict access on any device. In case of a lost or stolen device, you can remotely erase confidential data by wiping the device or the account.

    Protect company data using Google Vault

    You may save vital information, even from inert accounts, for as long as needed using Vault. To protect user data against deleted files and suspended accounts, you can set retention policies and holds on particular Google Workspace applications. This helps your legal team foresee possible problems and mitigates data loss when employees leave the company.

    Universal search simplifies finding desired data, and content can be exported to printable formats. Vault enables tracking user activity, including searches, content views, and exports.

    Launch websites with Google Sites

    Need a website for your startup? Or maybe you’re an established company needing a new interactive way to share information with customers or remote teams.

    With Sites, your team can collaborate to build engaging, top-notch websites – no programming skills required. They can easily extract content from Google Workspace apps and drag it into grids or templates. They can also co-edit projects, leave comments, and control access just like in Docs.

    Achieve productivity and insights driven by AI

    Google Workspace uses machine learning, natural language processing, and other AI technologies to streamline processes, automate tasks, and provide teams with data-driven insights for making informed business decisions.For instance, Google Assistant helps find and add optimized rooms for each attendee when employees schedule virtual meetings in Calendar. Smart Compose in Gmail can complete sentences for users, and Nudge reminds them to respond to messages. Additionally, Google Sheets is integrated with BigQuery, allowing employees to conveniently manage, analyze, and interpret large amounts of real-time data.

    Ensure a uniform experience on all devices

    Google Workspace is compatible with any internet browser, but it provides the best experience on Google Chrome. Users can create a Google Chrome bookmark bar and sync Chrome across all their devices to access Google Workspace. This means that whether your team members are using a smartphone, tablet, or laptop, they can have access to an optimized desktop.

    Explore more essential apps to support your growing business, and take advantage of exclusive business pricing, financing, trade-in options, and deals on everything from phones and tablets to monitors and memory.

    Conclusion

    Transitioning your small business to Google Workspace offers numerous benefits, providing enhanced control, security, and productivity features. It enables efficient communication, seamless file management, real-time collaboration, and digital transformation for modern work setups. Google Workspace empowers your team and positions your business for success in the digital era.

  • Enhance Your Server Security with BitNinja: A Comprehensive Solution

    Enhance Your Server Security with BitNinja: A Comprehensive Solution

    In the rapidly evolving world of cybersecurity, protecting your servers from increasingly sophisticated threats is more critical than ever. With the rise of cyber-attacks, ensuring robust security measures is a top priority for businesses of all sizes. Enter BitNinja, a comprehensive server security service designed to offer powerful protection against a wide array of cyber threats. This blog will explore how BitNinja can transform your server’s security posture, ensuring your data remains safe and your operations run smoothly.

    Understanding the Importance of Server Security

    Before delving into the specifics of BitNinja, it’s essential to understand why server security is so crucial. Servers are the backbone of your digital infrastructure, hosting websites, applications, and sensitive data. A breach can lead to data loss, financial damage, and reputational harm. Therefore, a robust security solution like BitNinja is indispensable.

    What is BitNinja?

    BitNinja is an all-in-one server security suite designed to protect against a multitude of cyber threats, including DDoS attacks, malware, brute force attacks, and more. It provides a comprehensive defence mechanism through a combination of proactive and reactive security measures, ensuring your servers remain secure 24/7.

    Key Features of BitNinja

    1. Integrated Defense System

    BitNinja’s integrated defence system is its cornerstone feature. It combines various security layers, including WAF (Web Application Firewall), DDoS protection, malware detection, and real-time IP reputation. This multi-layered approach ensures that no threat goes unnoticed, providing a holistic shield for your servers.

    2. Real-Time IP Reputation Management

    BitNinja maintains a global database of IP addresses with real-time reputation scores. This system helps in identifying and blocking malicious IPs before they can harm your server. By sharing threat intelligence across its network, BitNinja ensures that all users benefit from collective protection.

    3. Web Application Firewall (WAF)

    The WAF included in BitNinja provides robust protection for your web applications. It filters and monitors HTTP traffic between your web application and the Internet, blocking potential threats like SQL injection, cross-site scripting (XSS), and other web-based attacks.

    4. DDoS Protection

    Distributed Denial of Service (DDoS) attacks can cripple your server by overwhelming it with traffic. BitNinja’s DDoS protection mitigates these attacks by detecting and filtering malicious traffic, ensuring your server remains operational even during an attack.

    5. Malware Detection and Removal

    Malware can cause severe damage to your server and data. BitNinja’s advanced malware detection engine scans your server continuously, identifying and removing any malicious software. This proactive approach ensures that malware is dealt with before it can cause significant harm.

    6. Brute Force Attack Protection

    Brute force attacks, where hackers attempt to guess passwords through trial and error, are a common threat. BitNinja protects against these attacks by identifying and blocking IP addresses that exhibit suspicious behaviour, such as multiple failed login attempts.

    Benefits of Using BitNinja

    1. Comprehensive Protection

    BitNinja’s multi-layered security approach ensures comprehensive protection against a wide array of threats. This holistic protection minimizes the risk of breaches and ensures your server remains secure at all times.

    2. Ease of Use

    Despite its advanced features, BitNinja is incredibly user-friendly. The intuitive dashboard provides an overview of your server’s security status, and the detailed logs and reports help in understanding potential threats and actions taken.

    3. Cost-Effective Solution

    Investing in BitNinja is cost-effective, especially when compared to the potential losses from a security breach. Its all-in-one nature means you don’t need to invest in multiple security solutions, saving both time and money.

    4. Community-Based Protection

    One of the standout features of BitNinja is its community-based protection model. By sharing threat data across its user base, BitNinja ensures that all users benefit from the collective intelligence, enhancing overall security.

    How to Get Started with BitNinja

    Getting started with BitNinja is straightforward. The installation process is simple, with comprehensive documentation available to guide you through each step. Once installed, BitNinja starts protecting your server immediately, with real-time monitoring and automatic threat mitigation.


    Conclusion

    In today’s digital landscape, ensuring the security of your servers is paramount. BitNinja, available through Bytenap.in, offers a comprehensive, cost-effective, and user-friendly solution to protect your server from a multitude of cyber threats. With its integrated defence system, real-time IP reputation management, WAF, DDoS protection, and more, BitNinja stands out as a robust security solution. Invest in BitNinja through Bytenap.in today and fortify your server’s defences to safeguard your digital infrastructure.

  • Understanding Linux Malware Attacks

    Understanding Linux Malware Attacks

    Linux Hosting environments have suffered a massive uptick in malware attacks over the past year, and bad actors are carrying out their attacks with the help of lots of different techniques. As an operating system that hosts various servers and backends for other applications, Linux Hosting has become the target of cybercriminals interested in compromising critical infrastructure.
    Considering that Linux-targeted malware is on the rise and is becoming more sophisticated, organizations must understand which attacks they should look for and how best to secure their critical infrastructure along the way. To that end, let’s dive into what a Linux Hosting malware attack is, as well as the most common ones to keep an eye out for.

    Linux malware attacks: Means what?

    The prevalence of Linux as the operating system for most modern cloud environments has led to a notable increase in malware attacks targeting Linux Hosting systems. Threat actors penetrating these environments can compromise a wide range of sensitive assets, employing ransomware to inflict significant harm on critical infrastructure.

    In recent years, cybercriminals have increasingly targeted Linux-based systems to infiltrate networks and compromise essential infrastructure. Exploiting vulnerabilities and authentication issues, these attacks have proven distressingly successful and are evolving rapidly. Strains of malware tailored for Linux Hosting platforms, including trojans and ransomware, have seen a notable surge in recent years.

    Types of Linux Hosting malware attacks to watch for

    With a growing number of organizations shifting towards cloud-hosted environments relying on Linux, the trend of Linux malware attacks is expected to rise. As Linux-targeted malware becomes increasingly sophisticated, organizations must recognize prevalent attack types and implement effective defence strategies.

    In this regard, let’s explore some of the primary Linux malware variants to remain vigilant against.

    Malware targeting VM images

    Recently, ransomware groups have turned their attention to identifying vulnerabilities in Linux-based environments, marking a concerning trend. While the quality of many malware samples remains unremarkable, dangerous factions like Hive, Conti, among others, are actively enhancing their malware capabilities.

    Ransomware attacks targeting cloud-hosted environments are meticulously orchestrated, with skilled threat actors seeking to fully compromise systems before initiating file encryption. Notably, cybercriminals are now honing in on virtual machine images utilized for workloads, indicating a strategic shift towards targeting valuable resources in cloud environments to maximize impact.

    Fortunately, certain platforms offer defenses against Linux malware attacks across cloud-based and on-premises environments. Leveraging machine learning and artificial intelligence, these platforms provide organizations with enhanced visibility and context to detect and mitigate malware threats effectively. Given the expected growth in the machine learning market, it’s likely that more platforms will adopt these advanced technologies to combat evolving malware threats.

    Cryptojacking

    Among Linux Hosting-targeted malware attacks, cryptojacking emerges as a pervasive threat. Cybercriminals stand to profit significantly from crypto-jacking schemes, exploiting victims’ computational resources to generate cryptocurrency.

    The public became acutely aware of cryptojacking following an incident involving Tesla’s public cloud. Exploiting a lack of password protection in the company’s Kubernetes console, hackers infiltrated the system, gaining access to sensitive data.

    Gangs employing cryptojacking malware often target victims using default password lists or exploiting vulnerabilities in poorly secured systems. Once the malware is deployed, threat actors can clandestinely mine cryptocurrency, with the infected devices typically exhibiting performance degradation without the user’s knowledge.

    To combat cryptojacking, organizations should monitor for indicators such as sudden spikes in CPU usage and device overheating. Deploying antivirus software can thwart malicious attempts and facilitate early detection of crypto-jacking attacks.

    State-sponsored malware

    Security analysts tracking nation-state entities have noted an intensified focus on attacking Linux environments. The ongoing conflict between Russia and Ukraine appears to fuel this surge in Linux-targeted malware.

    Past media coverage has implicated Russia in cyberattacks following its Crimea invasion and subsequent incidents in Ukraine. These attacks, purportedly aimed at disrupting communications, continue to be attributed to Russian state-backed cybercriminal groups, causing concern among Western governments.

    Companies diligently monitoring the Russia-Ukraine conflict have documented instances of Solaris and Linux worms leveraging the Secure Shell Protocol and compromised access credentials to propagate rapidly. These attacks aim to obliterate sensitive data stored within file systems and databases.

    Fileless attacks

    Security experts have identified cybercriminal groups employing the open-source Ezuri tool, written in Golang, to encrypt malicious code. This malicious code operates from memory after decryption, leaving no traces on the disk. Consequently, it becomes highly challenging for antivirus software to detect.

    The primary group utilizing this file-less attack technique is known as TeamTNT. They target improperly configured Docker-based systems, leveraging this approach to install cryptocurrency miners and DDoS bots.

    Strategies for Preventing Malware Attacks

    To shield against Linux-targeted malware, developers and system administrators should prioritize avoiding the trap of overcommitting their attention. It’s crucial to resist rushing tasks and foster an atmosphere that promotes skepticism towards community-sourced code.

    Cybercriminals exploit lapses in this “attention economy” and patiently wait for vulnerabilities, like a developer inadvertently exposing a container deployment to the public, which can serve as a launching pad for further attacks.

    Organizations must meticulously manage security group settings and firewalls on their Linux Hosting servers to prevent unauthorized access to deployed applications. Linux Hosting-targeted malware thrives in server environments, consumer devices, specialized operating systems, and virtual setups. Thus, investing in comprehensive and strategic security measures is imperative to safeguard these assets effectively.


    Conclusion

    In summary, grasping the intricacies of Linux Hosting malware attacks is crucial for implementing effective defence strategies. By staying vigilant, adopting cautious practices, and investing in robust security measures, individuals and organizations can mitigate the risks posed by such threats and safeguard their systems and data.

  • Ultimate Guide on PostgreSQL Hosting  Applications

    Ultimate Guide on PostgreSQL Hosting  Applications

    Ultimate Guide on PostgreSQL Hosting Applications

    PostgreSQL is a robust, open-source object-relational database system known for its scalability, robustness, and performance in managing various data types. It offers support for both SQL (relational) and JSON (non-relational) queries, making it a flexible option for developers and businesses. For Linux system administrators, mastering the hosting of PostgreSQL can greatly enhance the performance and reliability of your applications. Whether you are establishing a database for a small development project or a large enterprise application, selecting the appropriate hosting environment is crucial. This guide will walk you through different hosting choices, ranging from self-managed setups like dedicated servers and virtual private servers to fully managed solutions provided by cloud services. Additionally, we will cover the necessary system requirements to ensure optimal efficiency of your PostgreSQL server.

    Where and How to Host PostgreSQL

    There are several options available, each with its unique advantages and considerations. Your choice will depend largely on the specific needs of your application, your budget, and your team’s expertise.

    Self-Managed PostgreSQL Hosting Solutions
    • Local Development Environment: Hosting PostgreSQL on your local machine is a popular option for development and testing. This configuration enables rapid iteration and debugging without requiring network connectivity. Nonetheless, it is not recommended for production environments due to scalability constraints and security issues.
    • Dedicated Server: Using a dedicated server gives you complete control over the hosting environment. This choice is perfect for applications needing high performance and extensive customization. With a dedicated server, you can tailor the system for PostgreSQL, guaranteeing maximum efficiency and security.
    • Virtual Private Server (VPS): A VPS provides a balance between cost and control, offering a private, dedicated portion of a server at a lower cost than a fully dedicated server. It is ideal for small to medium-sized applications and allows you to customize the server as required.
    Managed PostgreSQL Hosting Options
    • Cloud Providers: Cloud hosting is gaining popularity due to its scalability and flexibility. Leading providers such as AWS, Google Cloud, and Azure provide PostgreSQL as a service, allowing for easy scaling based on demand. Cloud VPS hosting also ensures high availability, disaster recovery, and geographic redundancy.
    • Third-Party Managed Services: For businesses not wanting to handle their database infrastructure, third-party managed services can be a great option. These services manage all aspects of database management, such as maintenance, backups, and scaling, letting you concentrate on your application development.

    Each hosting option has its trade-offs, and the optimal choice depends on your specific requirements like budget, scale, and administrative overhead. Thoughtful evaluation of these factors will assist you in choosing the most suitable environment for your PostgreSQL database.

    Using Docker for PostgreSQL Hosting

    Docker has become a powerful tool for deploying and managing applications, including databases such as PostgreSQL. Here is how Docker can improve the PostgreSQL hosting experience:

    Advantages of Using Docker
    • Consistency Across Environments: Docker containers guarantee PostgreSQL runs consistently, irrespective of deployment location, avoiding the “it works on my machine” issue. 
    • Simplified Configuration: Docker streamlines PostgreSQL setup, enabling quick creation of a new instance with predefined configurations through Dockerfiles or Docker Compose scripts. 
    • Isolation: Containers offer isolation from the host system, simplifying the management of multiple PostgreSQL versions or instances without conflicts. 
    • Resource Efficiency: Docker optimizes system resources better than conventional virtual machines, offering a lightweight, easily scalable alternative.
    How to Set Up PostgreSQL with Docker
    1. Install Docker: Begin by making sure Docker is installed on your system. If it’s not already installed, you can download it from the official Docker website and follow the installation instructions for your operating system.
    2. Download the PostgreSQL Image: To fetch the official PostgreSQL image from Docker Hub, open a terminal and execute the following command:

    docker pull postgres

    This command retrieves the most recent PostgreSQL image, guaranteeing you possess the latest database version.

    3. Configure and run the PostgreSQL container: Once the image is pulled, you can start a PostgreSQL container with your specified settings. Use the following command to launch your PostgreSQL server with Docker:

    docker run --name my-postgres -e POSTGRES_PASSWORD=mysecretpassword -d -p 5432:5432 postgres

    Here is the breakdown of each command part:

    name my-postgres: Assigns a name to your container for simplified management.

    -e POSTGRES_PASSWORD=mysecretpassword: Defines the environment variable POSTGRES_PASSWORD, setting the default password for the PostgreSQL server.

    d: Executes the container in detached mode, enabling it to run in the background.

    • -p 5432:5432: Links port 5432 of the container to port 5432 on your host, facilitating database connectivity.

    4. Accessing and Managing the PostgreSQL Database: To access the running PostgreSQL instance, use any PostgreSQL client with the following connection details:

    Host: localhost 

    Port: 5432 

    User: postgres (default) 

    Password: mysecretpassword (as set above)

    You can interact with the database using command line tools or graphical interfaces such as pgAdmin.
    5. Using Docker Compose: For more intricate configurations, Docker Compose can be utilized to define and execute multi-container Docker applications. Generate a docker-compose.yml file with the subsequent content to establish PostgreSQL:

    version: '3.1'
    services:
    db:
    image: postgres
    restart: always
    environment:
    POSTGRES_PASSWORD: mysecretpassword
    ports:
    - "5432:5432"

    Run `docker-compose up` to start the PostgreSQL container as defined. This method is especially helpful for development environments where you might need to run multiple services, such as connecting PostgreSQL with web application containers.

    System Requirements for Hosting PostgreSQL

    The system requirements for hosting PostgreSQL can vary significantly based on the intended use case and the hosting option chosen. However, there are general guidelines that can help ensure optimal performance and stability of your PostgreSQL server.

    Hardware Requirements

    • CPU: The processing power required varies depending on the workload. While a dual-core processor may be adequate for small applications, large databases handling heavy transaction loads will benefit from multi-core or multiple processors.
    • Memory: PostgreSQL utilizes memory for caching data, managing indices, and handling connection overhead. A minimum of 2 GB is suggested for small setups, but production environments should begin with at least 8 GB and increase as needed based on the workload.
    • Storage: SSDs are recommended for production environments due to their speed and reliability. The storage size will depend on your data needs, but starting with at least 100 GB is a common practice. Ensure that there is enough space for growth and backups.

    Software Requirements

    • Operating System: PostgreSQL is compatible with multiple operating systems like Linux, Windows, and macOS. In production settings, Linux distributions such as Ubuntu, CentOS, or Red Hat are usually favored for their stability and performance. 
    • PostgreSQL Version: It is advisable to always utilize a supported version of PostgreSQL to access the newest features and security updates. Currently, PostgreSQL 14 is well-supported and highly recommended.

    Network Requirements

    • Bandwidth: Sufficient bandwidth is essential for high-performance applications, particularly when the database is accessed over the internet.
    • Latency: Minimal latency is crucial for applications that require real-time access to the database.

    Security Recommendations

    • Ensure consistent updates and patches for the operating system and PostgreSQL to prevent vulnerabilities.
    • Establish strong access controls and authentication methods.
    • Consider encrypting data at rest and in transit, particularly for sensitive information.

    By comprehending and setting up appropriate system requirements, you can establish a hosting environment that enhances the efficiency and security of your PostgreSQL database. These suggestions provide a foundation, which may require modifications as your application’s needs change.


    Selecting the appropriate hosting solution for PostgreSQL presents a challenge. It marks the initial stride towards ensuring your database effectively caters to your applications’ demands. Whether you choose a self-managed approach such as a local development setup, a dedicated server, Docker usage, or a VPS, or opt for a managed hosting service via cloud providers or third-party vendors, each avenue brings distinct advantages and obstacles. Comprehending the system prerequisites holds significance as well. This ensures that your PostgreSQL setup functions optimally maintains security, and scales in alignment with your application’s expansion.

    Conclusion

    Through meticulous evaluation of your hosting alternatives and setting up the requisite system environment, you can establish a sturdy groundwork for your PostgreSQL databases. This configuration not only backs your current functionalities but also adjusts to forthcoming requirements, guaranteeing enduring prosperity and steadiness.

  • Upgrade Your Website Speed with SSD Linux VPS Hosting

    Upgrade Your Website Speed with SSD Linux VPS Hosting

    Upgrade Your Website Speed with SSD Linux VPS Hosting

    Website Hosting on Linux VPS Hosting SSD storage generally loads faster and performs better than those hosted on traditional HDD storage. SSDs have a lower failure rate, consume less power, and offer faster read/write speeds. Therefore, if you want a fast and efficient website, choosing SSD storage is the best.

    While both SSDs and HDDs perform similar tasks such as booting your system, storing your applications, and saving your files, there are some differences between the two types of storage. Let’s explore these differences below
    .

    HDD vs SSD

    HDD SSD
    It is crucial to conduct regular defragmentation of a hard drive due to the damaging impact of fragmentation on overall disk performance. This necessary process ensures optimal performance and should be noticed. It is important to note that the performance of SSDs remains unaffected by the process of fragmentation. Therefore, the practice of defragmentation is considered unnecessary for these devices.
    The access speed of typical HDDs is relatively slow, primarily due to the 5 to 10-millisecond data access time. Solid state drives (SSDs) Linux VPS Hosting are a preferred data storage solution due to their superior speed performance. The lack of mechanical seek time or latency associated with flash memory storage allows SSDs to achieve access times running from 25 to 100 microseconds. This is up to 100 times faster than traditional hard drives, making SSDs a reliable and efficient option for data storage in high-performance computing environments.
    The average boot-up time for a hard disk drive (HDD) is estimated to be around 45 seconds. It is worth noting that the average boot-up time for a Solid State Drive (SSD) is just 20 seconds. This information is valuable to those interested in the performance and speed of computing devices.
    The hard disk drive (HDD) operates at varying speeds determined by its rotatory mechanics. Data closer to the moving head is accessed at a faster rate due to the proximity of the data to the read/write head. Linux VPS Hosting Solid-state drives (SSDs) offer advantages over traditional hard drives, including faster read/write functions and noise-free operation. In addition, file transfers can be completed more quickly, making SSDs an ideal choice for businesses seeking to improve their overall computing performance.
    The performance of devices that use read/write operations is often slower than that of SSDs due to the involvement of moving parts. It’s important to consider this factor when determining the optimal storage solution for a given application. Linux VPS Hosting with SSD technology delivers superior read/write performance when compared to HDDs, due to the absence of moving parts. Data is retrieved directly from the storage, eliminating the need for mechanical delays associated with spinning disks.

    For businesses that prioritize speed and noise reduction, SSD Linux VPS Hosting packages are an excellent choice. While HDDs may offer a more cost-effective solution, their performance cannot match that of SSDs when it comes to lightning-fast response times and seamless browsing capabilities. Those seeking an affordable, yet high-performance hosting solution are encouraged to consider SSD Linux VPS Hosting.

    Conclusion

    Upgrading to SSD Linux VPS Hosting promises a significant boost in website speed and performance. By harnessing the power of solid-state drives and the flexibility of a virtual private server, businesses can enhance user experience, improve search engine rankings, and ultimately drive more conversions. Embracing this technology represents a strategic investment in the future of your online presence, ensuring reliability, scalability, and unparalleled speed for your website.

  • Sign Up with cPanel Linux Hosting | Learn About Its Functionalities & Uses

    Sign Up with cPanel Linux Hosting | Learn About Its Functionalities & Uses

    cPanel is a widely used control panel in web development and hosting industries. It eliminates the need for technical expertise, allowing users to manage their web hosting tasks with ease. Its intuitive interface and beginner-friendly dashboard make it easy to use. This blog will explain cPanel Linux Hosting.

    cPanel is a user-friendly control panel that simplifies web hosting for non-technical users. It’s often paired with Web Host Manager (WHM) for website management but serves a different function. Web hosting providers use WHM to operate website servers, while cPanel helps manage website administration. It offers file management, MySQL, software installation, database search, analytics, and more features. Most shared hosting plans come with cPanel, and it’s compatible with advanced hosting solutions like dedicated servers, cloud hosting, cPanel Linux Hosting, and managed WordPress hosting plans.

    It is a Linux-based hosting solution that has a pre-installed cPanel as a control panel. Hosting providers use WHM for managing servers and creating cPanel accounts for their customers. Website owners prefer cPanel hosting as it eliminates the need to hire a professional web developer. Users with minimal technical expertise can easily manage their website’s data using cPanel.

    cPanel Linux Hosting is highly intuitive and user-friendly. It offers a wide range of tools for easy file and email management, database handling, high-security features, and more. It is scalable, affordable, and reliable, and readily integrates with various themes and plugins for customization.

    Access and Effective Utilization

    To access the cPanel dashboard allocated for your website, there are two main methods. The first uses a direct link, while the second uses a browser.

    Direct Link:

    Linux Hosting provider often provides their users with a direct link in their welcome email after they purchase their plans. To find the direct link, just search for the welcome email you received from the service provider. Once you locate the direct link in the email, click it to be redirected to the cPanel dashboard.

    Using A Browser:

    To access the cPanel dashboard using a browser, type your website’s URL in the address bar of your web browser.

    Enter your cPanel username and password. Usually, the credentials are included in your welcome email. (If you can’t find them, contact your web hosting’s support.)

    Click the “Log in” button.

    Access the Dashboard

    Once you’re logged in successfully, you’ll be taken to the cPanel dashboard, where you can manage various aspects of your website, including files, emails, databases, and more.

    cPanel Dashboard

    After logging in to cPanel Linux Hosting, the dashboard shows the main sections and features. The dashboard and features may vary from provider to provider, but most have a general category. Let’s take a look at each feature.

    Files

    This section is for file management and includes options to upload, download, manage, and edit files on your website. You can also create and restore backups of your website and files, and check your disk usage.

    Softaculous App Installer

    This section is essential for website management. Major options include easy installation of popular web applications like WordPress, Joomla, and Drupal, a website builder for basic sites, subdomains for different projects, and addon domains for hosting multiple sites on one account.

    Email

    This section within the cPanel Linux Hosting dashboard is designated as the Email section, and its purpose is the management of all email-related tasks. The section includes an array of features: –

    Email Accounts: You can create and manage email accounts for your domains.

    Forwarders: You can set up email forwarding to other addresses.

    Autoresponders: This feature enables you to manage and send automatic responses to incoming emails.

    Spam Filters: The built-in configuration of spam filters safeguards and organizes your inbox for you.

    Databases

    The database section has two options:

    1. MySQL Databases: create and manage website databases with MySQL.

    2. phpMyAdmin: manage databases with a graphical interface.

    Security

    cPanel Linux Hosting offers a range of security features to keep your website protected. You can install SSL/TLS certificates for secure browsing, block IP addresses, protect against unauthorized file downloads, and configure various security settings.

    It offers several features including Metrics for resource usage statistics, Software for easy installation and management of applications, and Preferences for customization options.

    The cPanel Way To Install WordPress

    cPanel Linux Hosting is a popular tool for managing WordPress CMS. There are two ways to install WordPress from cPanel: Softaculous for beginners and the manual method for advanced users. To install WordPress via Softaculous, log in to your cPanel account, go to Software > Softaculous Apps Installer, search for “WordPress,” and follow the instructions. For the manual method, download WordPress from WordPress.org, create a database and user in cPanel, upload WordPress files to your server, edit the wp-config.php file, run the installation script, and you’re done. We hope this guide helps you install WordPress effortlessly with cPanel Linux Hosting.

    Exploring cPanel’s Functions: Understanding Its Purpose

    ccPanel is a tool that streamlines website management tasks. Once you log in to the dashboard, you can manage website files, create email accounts, install software, enable Cloudflare, update DNS records, monitor site metrics, configure security layers, and activate cron jobs. These tasks are completed from various sections of the cPanel dashboard.

    cPanel Linux Hosting is a user-friendly web hosting control panel that simplifies website management. It offers a robust set of features suitable for small and large websites alike and is both secure and reliable.

    Conclusion

    In conclusion, cPanel Linux Hosting offers a robust and user-friendly platform for managing websites and online projects. Its functionalities are diverse and cater to both beginners and advanced users alike. From easy installation of popular applications to efficient management of email accounts and databases, cPanel simplifies the often complex tasks associated with web hosting.

    With its intuitive interface and comprehensive features, cPanel empowers users to take control of their web hosting experience. Whether it’s setting up domains, managing files, or monitoring website performance, cPanel provides the tools necessary to streamline these processes.

    Moreover, its compatibility with Linux servers ensures stability, security, and scalability, making it a preferred choice for hosting providers and website owners worldwide. Overall, cPanel Linux Hosting stands as a reliable solution for anyone seeking a powerful and user-friendly platform to host their websites and online projects.